Today I finally gained the motivation to finish fitting the under felt to the car. This was a slow job as the foot wells on the Marcos car are not the easiest to gain access to. Cardboard templates were made first and then these were used to cut out sections of felt just slightly larger than the template. The sections of felt were then fitted and trimmed to size before being glued into place with contact adhesive. The first one to be completed was the passengers foot well and this proved to be much easier as there were no pedals in the way and you could also gain access from under the bonnet as the battery box has still not been fitted to the car. To make it easier to work on the drivers foot well the steering wheel was also temporarily removed but by the time I had finished gluing the felt in place my knees were sore and I was light headed from the glue fumes. The photo below show the completed drivers foot well.
19-Feb-2009
The fiber glass on the rear speaker panels had set so the first task was to cut the holes for the speakers I plan to fit. The photo below shows the speaker panels ready to be recovered. These were then fitted to car to ensure the fit was OK before being recovered in vinyl. Once this was completed 2 section of the dash were also recovered in vinyl.
18-Feb-2009
Today I made a start on the interior of the car. The first area I worked on were the rear speaker panels. One of these had a hole cut in for a speaker and the other was complete. As the speakers I have bought are a different size the first task was to fill the hole with fibre glass so a different size hole could be cut. Once this was complete I started cutting felt and gluing it to the rear parcel shelf.
24-Sep-2008
I’ve not achieved much in the last month as I’ve been busy at work, but the majority of my time on the Marcos has been spent fixing faults with items that I have previously worked on. This means it might look the same but mechanically it now has less faults. The majority of my time has been spent working on the engine. I managed to buy a set of heads on eBay to replace the cracked one on my car. Before replacing the cracked head I took one of them to my local machine shop to have hardened exhaust valves fitted. Once this was done I took the engine apart to replace the cracked head. While the engine was apart I also took the opportunity to also replace the cam shaft with an up rated item.
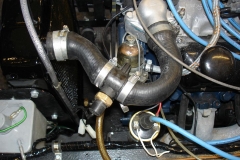
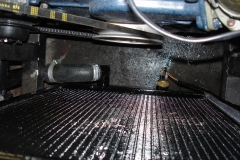
Another issue I discovered with the engine was the sensor for the radiator cooling fan was not working correctly. Suspecting the sensor was faulty I bought a replacement but still had the same problem. By using an infrared thermometer I could determine that the radiator and water was getting hot enough but some how the plastic adapter the sensor was mounted in was insulating the switch and preventing it from warming up at the same speed as the water. I confirmed this assumption by removing the radiator cap and lowering the senor directly into the water at the top of the radiator. With the sensor sitting directly in the water the fan worked correctly! This left me with two options, either find a metal adapter for the sensor as this would help conduct the heat from the water to the sensor or mount it directly in the radiator. I decided the cheapest option was to mount it directly into the radiator. Although this was simple and cheap to do it was also a lot of hassle. The radiator had to be removed and a threaded nut soldered into the bottom of the radiator. Once this had been completed the radiator needed to be painted again. One of the photo’s below show the sensor mounted into the bottom of the radiator and the other one show the sensor mounted in the plastic adapter.
After making these changes the electric fan now seems to operate correctly e.g. the fan comes on before the water starts to boil! All I need to do now is fit a new top radiator hose so I can remove the old adapter from the car.
The other electrical items I’ve fixed are the dynamo control box and the Rev counter. The dynamo control box was the simplest as all I did was by a new one and fit it to the car. The rev counter was a little bit more difficult. As I’ve mentioned early in my blog the Rev counter fitted to the Marcos does not work with electronic ignition. The simplest solution is to buy a later RVC smiths tacho and run and extra wire to the coil. The only issue with doing this is that the gauge will no longer look original. My solution to this was to use the internals of a later RVC rev counter but fit the dial and needle from my original tacho so everything looks original. If anyone wants more information about this, email me but you will find a useful document about tacho conversions in the download section of my web site.
19-Aug-2008
I’ve made some progress over the last few days. I’ve finished painting the steering column, hand brake and petrol tank. This has been followed by fitting these to the car. Although this should be a relatively simple job the steering took much longer than anticipated. Actually I think I have lost count of how many times I’ve had to fit and remove it to get every thing to line up. The first issue was to get the rose joints adjusted correctly so the steering didn’t touch the fan belt, while also not fouling the chassis and for the angle of the knuckle joints not to be to tight so they don’t rotate correctly. Once this was achieve I still had to take it apart a couple of more times so I could get the steering column in the correct place so the indicators switch would turn off after going around a corner! I think I’m almost there except it will have to come apart one more time as I have discovered the bushes in the column are worn! I’ve ordered some replacements so this will be another job to do at some point in the future.
With the steering column in place I have also spent some time fitting and rewiring the dash. Although this will be removed at some pint in the future to be recovered I wanted to find out what gauges were operating correctly and what were not! So far I think I have a problem with the temperature gauge reading to high along with the tachometer not working. The problem with the tachometer is probably related to the electronic ignition fitted to my car but I still need to investigate the temperature gauge.
The photo below shows the dash and steering column fitted back in the car.
This weekend while I was visiting friends in Portsmouth I took the opportunity to collect a set of heads I had bought on EBay. One of these was cleaned up and I took it to the machine shop to have hardened exhaust valve seats fitted. With a bit of luck I’ll get this back in a couple of weeks so I can replace the one on my car that is cracked.
I still have a couple of more jobs that I want to get completed this week before I return to work. The main one is I want to paint the inside of the bonnet before the car is sent off to be painted. I also want to fit the front a rear bumpers now as it will still be possible to fill and re-drill the holes if the are not in the correct place (once the car is painted this will not be possible).